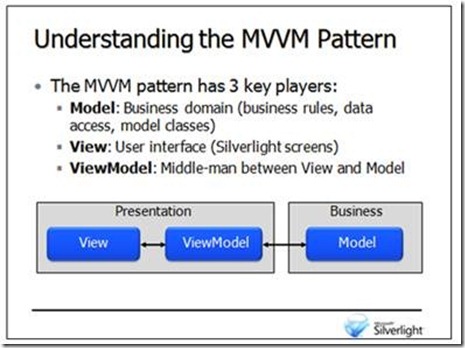
Today I found very nice article about MVVM pattern and realization of it with Service Agent. Dan Wahlin's in his web log. This solution can help to develop good and testable ViewModel part with help of third class called Service agent which is injected in the main ViewModelBase class. The MVVM pattern defines three key parts including the Model, the View and the ViewModel. The following image shows a slide from a Silverlight course run that sums up the role of each part of the MVVM pattern in a concise way.

Looking through the description of each part you can see that the Model represents the business domain which includes the model classes used (Customer, Order, etc.), data access code and business rules. In general you can think of the Model as representing the entities that live on the server as well as the objects that are responsible for interacting with the data store your application uses and filling entities with data. While some people feel that the Model represents only the model classes (classes like Customer, Order, etc.) used in the application I personally think of it more broadly and include data access code and business rules in the Model definition. Silverlight applications will call into the Model code through services written using WCF, ASMX, REST or even custom solutions.
The View in MVVM represents the Silverlight screens that you build. This includes the XAML files and the code-beside files that are responsible for showing data to end users. The View's responsibilities include displaying data and collecting data from end users. A given View isn't responsible for retrieving data, performing any business rules or validating data.
The ViewModel acts as the middle-man between the View and the Model. It's responsible for aggregating and storing data that will be bound to a View. For example, a ViewModel may contain a List<State> property and a List<Person> property that may be bound to two ComboBox controls in a View. The ViewModel will retrieve the values held by these two properties from the Model. By using a ViewModel the View doesn't have to worry about retrieving data and knows nothing about where data comes from.
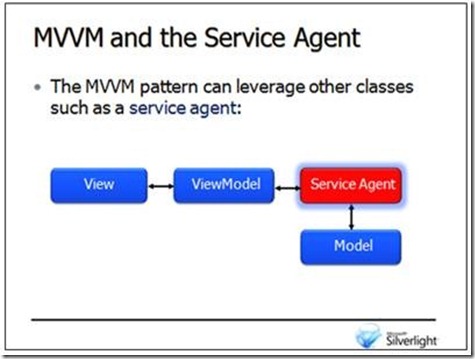
Additional players may be added into the Model-View-ViewModel mix to help segregate code even further. For example, I normally create a service agent class that is responsible for making calls from Silverlight to remote services. The service agent is responsible for initiating the service call, capturing the data that's returned and forwarding the data back to the ViewModel. By doing this the ViewModel classes can delegate data gathering responsibilities to the service agent. A given service agent can also be re-used across multiple ViewModel classes as needed. The following image shows how the service agent can be integrated into the MVVM pattern:

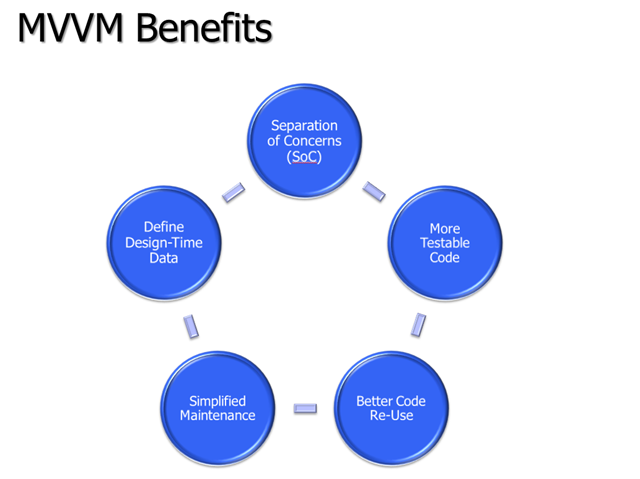
When developers first start building Silverlight applications they typically add all of the code for the application into the XAML's code-beside file (MainPage.xaml.cs for example). Although this approach certainly works, by following the MVVM pattern you can take advantage of several inherent benefits including better code re-use, simplified maintenance, more modular code and enhanced testing support. I'll focus on the overall benefits achieved by building applications that are based on the MVVM pattern throughout the rest of this article.
The Model
There are many different ways that the Model can be created including using Microsoft's Entity Framework or LINQ to SQL technologies, nHibernate, PLINQO, SubSonic, custom solutions and more. The technology chosen is generally unique to a given company's development policies so I'm not going to go into a discussion of the pros and cons of each technology here. What's important is that one or more classes used by a Silverlight application are "modeled" using tools or by writing code by hand. This involves defining all of the properties that each class will expose. A simple example of a Model class is shown next:
public class Person
{
 public string FirstName { get;set;}
 public string LastName { get;set; }
 public int Age { get; set; }
}
Once the Model classes are in place they'll need to be populated with data from a data store which can be done by writing custom code or using ORM frameworks that handle mapping query results to object instances. Services will also need to be written to expose one or more of the Model classes used in a Silverlight application which can be done using WCF, ASMX or even custom REST services.
The View and ViewModel Classes
Once the Model is ready to go, you can create the View and ViewModel classes. As mentioned earlier, a View represents a Silverlight screen that end users interact with which includes the XAML file and the associated code-beside file. Rather than adding all of the code to call the Model and retrieve data directly into the View's code-beside file, the View will rely on a ViewModel class to retrieve data and then bind to the properties of the ViewModel.
ViewModel classes should implement an interface that's available in Silverlight called INotifyPropertyChanged which defines a single event named PropertyChanged. This event is used to notify different Silverlight bindings that data has changed for one or more properties so that controls can be updated automatically. Although INotifyPropertyChanged can be implemented directly on a ViewModel class, your application may have multiple ViewModel classes in it and writing the same code over and over tends to get old. Creating a base ViewModel class that handles implementing INotifyPropertyChanged is useful to minimize code and allow more re-use to occur in applications. The following code shows a class named ViewModelBase that implements the INotifyPropertyChanged interface. The class also provides an OnNotifyPropertyChanged method that can be used to raise the PropertyChanged event.
public class ViewModelBase : INotifyPropertyChanged
{
 protected void OnNotifyPropertyChanged(string p)
 {
 if (PropertyChanged != null)
 {
 PropertyChanged(this, new PropertyChangedEventArgs(p));
 }
 }

 public bool IsDesignTime
 {
 get
 {
 return (Application.Current == null) || (Application.Current.GetType() == typeof(Application));
 }
 }

 #region INotifyPropertyChanged Members

 public event PropertyChangedEventHandler PropertyChanged;

 #endregion
}
A ViewModel class can derive from ViewModelBase and automatically take advantage of the INotifyPropertyChanged interface. An example of a ViewModel class named PeopleViewModel that derives from the ViewModelBase class and defines several properties and methods is shown next:
public class PeopleViewModel : ViewModelBase
{
 IServiceAgent _ServiceAgent;
 Person _Person;
 ObservableCollection<Person> _People;

 public PeopleViewModel() : this(new ServiceAgent()) {}

 public PeopleViewModel(IServiceAgent serviceAgent)
 {
 if (!IsDesignTime)
 {
 _ServiceAgent = serviceAgent;
 GetPeople();
 }
 }

 #region Properties

 public Person Person
 {
 get
 {
 return _Person;
 }
 set
 {
 if (_Person != value)
 {
 _Person = value;
 OnNotifyPropertyChanged("Person");
 }
 }
 }

 public ObservableCollection<Person> People {
 get
 {
 return _People;
 }
 set
 {
 if (_People != value)
 {
 _People = value;
 OnNotifyPropertyChanged("People");
 }
 }

 }

 #endregion

 public void GetPeople()
 {
 _ServiceAgent.GetPeople((s,e) => this.People = e.Result);
 }

 public void UpdatePerson()
 {
 _ServiceAgent.UpdatePerson(this.Person, (s, e) =>
 {
 PeopleEventBus.OnOperationCompleted(this, new OperationCompletedEventArgs { OperationStatus = e.Result });
 });
 }
}
Looking through the code you'll see that PeopleViewModel defines two fields, two properties and two methods. Each property raises the PropertyChanged event as the set block is called by calling the OnNotifyPropertyChanged method defined in ViewModelBase. This notifies any controls bound to the properties that the values have changed which allows them to update the data they display automatically.
Looking at the first constructor in PeopleViewModel you'll see that it forwards the call to a secondary constructor that accepts a parameter of type IServiceAgent. Why have two constructors? This approach allows testing frameworks to pass in different types of service agents to the ViewModel when running tests. When the ViewModel is called at runtime the parameterless constructor will be called and an instance of a ServiceAgent class (shown next) will be passed as the IServiceAgent parameter. From there, once the service agent object is passed into the ViewModel's constructor a call to a method named GetPeople is made which invokes a method on the service agent and passes a callback delegate. The WCF service is then called by the service agent and the results are assigned to the People property.
public interface IServiceAgent
{
 void GetPeople(EventHandler<GetPeopleCompletedEventArgs> callback);
 void UpdatePerson(Person p, EventHandler<UpdatePersonCompletedEventArgs> callback);
}

public class ServiceAgent : IServiceAgent
{
 public void GetPeople(EventHandler<GetPeopleCompletedEventArgs> callback)
 {
 PeopleServiceClient proxy = new PeopleServiceClient();
 proxy.GetPeopleCompleted += callback;
 proxy.GetPeopleAsync();
 }

 public void UpdatePerson(Person p, EventHandler<UpdatePersonCompletedEventArgs> callback)
 {
 PeopleServiceClient proxy = new PeopleServiceClient();
 proxy.UpdatePersonCompleted += callback;
 proxy.UpdatePersonAsync(p);
 }
}
Binding a ViewModel to a View
Now that the ViewModel class is defined it can be bound to a View. This can be done declaratively in XAML or imperatively through code in the View's code-beside file. Imperative (or code-based) binding is typically accomplished by assigning a ViewModel instance to the layout root's DataContext property as shown next:
this.LayoutRoot.DataContext = new PeopleViewModel();
An example of declaratively binding a ViewModel (which is my personal preference) to a View is shown next:
<UserControl x:Class="ViewModelExample.MainPage"
 xmlns="http://schemas.microsoft.com/winfx/2006/xaml/presentation"
 xmlns:x="http://schemas.microsoft.com/winfx/2006/xaml"
 xmlns:d="http://schemas.microsoft.com/expression/blend/2008" xmlns:mc="http://schemas.openxmlformats.org/markup-compatibility/2006"
 xmlns:converter="clr-namespace:ViewModelExample"
 xmlns:viewModel="clr-namespace:ViewModelExample.ViewModel"
 mc:Ignorable="d" d:DesignWidth="640" d:DesignHeight="480">
 <UserControl.Resources>
 <viewModel:PeopleViewModel x:Key="ViewModel" />
 </UserControl.Resources>
 <Grid x:Name="LayoutRoot" DataContext="{Binding Source={StaticResource ViewModel}}">
 </Grid>
</UserControl>
The ViewModel namespace is first referenced using an XML namespace prefix of "viewModel". The ViewModel is then defined in the UserControl's Resources section and given a key of "ViewModel" (note that any name can be chosen for the key). The key is important since it's used to hook the ViewModel to the DataContext of the layout root using the {Binding Source={StaticResource ViewModel}} syntax. The declarative binding will cause a new PeopleViewModel instance to be created at runtime which is then bound to the layout root's DataContext. Child controls of the layout root can then bind to properties on the ViewModel. An example of binding a ListBox to the ViewModel's People property and a StackPanel to the Person property is shown next:
<StackPanel Margin="20">
 <TextBlock Text="Binding Controls to a ViewModel" Margin="20,0,0,0" FontWeight="Bold" FontSize="12" />
 <ListBox x:Name="lbPeople" Margin="0,10,0,0" Height="250" Width="300" HorizontalAlignment="Left"
 ItemsSource="{Binding People}" ScrollViewer.HorizontalScrollBarVisibility="Hidden"
 SelectedItem="{Binding Person, Mode=TwoWay}">
 <ListBox.ItemTemplate>
 <DataTemplate>
 <Grid>
 <Grid.ColumnDefinitions>
 <ColumnDefinition Width="100" />
 <ColumnDefinition Width="100" />
 <ColumnDefinition Width="100" />
 </Grid.ColumnDefinitions>
 <TextBlock Grid.Column="0" Margin="10" Text="{Binding FirstName}" />
 <TextBlock Grid.Column="1" Margin="10" Text="{Binding LastName}" />
 <TextBlock Grid.Column="2" Margin="10" Text="{Binding Age}" />
 </Grid>
 </DataTemplate>
 </ListBox.ItemTemplate>
 </ListBox>
 <StackPanel DataContext="{Binding Person}">
 <TextBlock Text="First Name" Margin="0,10,0,0" />
 <TextBox Text="{Binding FirstName,Mode=TwoWay}" Width="100" Height="25" HorizontalAlignment="Left"/>
 <TextBlock Text="Last Name" />
 <TextBox Text="{Binding LastName,Mode=TwoWay}" Width="100" Height="25" HorizontalAlignment="Left"/>
 <TextBlock Text="Age" />
 <TextBox Text="{Binding Age,Mode=TwoWay}" Width="100" Height="25" HorizontalAlignment="Left"/>
 </StackPanel>
 <Button Margin="0,10,0,0" Click="Button_Click" Content="Submit" Height="20" Width="100" HorizontalAlignment="Left" />
</StackPanel>

References
